Showing posts with label vegan. Show all posts

Saturday, October 16, 2010

Wonton Samosas


 I have a bit of a love affair with samosas.  My first introduction to Indian food was through samosas, and I have been hooked ever since.  Samosas are traditionally a deep fried pastry dough filled with delicious spiced potatoes, green peas, and onions served with a sweet tamarind chutney (or sauce).

This is a healthier and quicker alternative to the traditional recipe, using wonton wrappers (instead of making pastry dough) and baking the samosa (instead of deep frying).

 Wonton Samosas
 
Ingredients:
2 potatoes (any kind you like)
1/8 cup soy milk
1 tbs oil
1/2 tsp yellow mustard powder
1/2 tsp ground coriander
1 small onion, diced
1 clove garlic
1 tsp fresh grated ginger
1 tsp cumin
1/4 tsp turmeric
1/2 tsp salt
1/4 cup frozen peas
2 tbs lemon juice
1 package wonton wrappers (found in the produce isle of most grocery stores)

Directions:
1.  Bake the potatoes - wrap each in tin foil and bake in 400 degree oven for 1 hour. Allow to cool. Remove skins and discard, then chop potatoes. Reduce heat to 350.
2. Heat oil in large skillet over medium-high heat
3. Add mustard and coriander and cook for 2-3 minutes. Add the onion and saute until translucent and starting to brown. Add garlic and ginger and saute for another 2-3 minutes.
4. Add the cumin, turmeric, salt and a splash of water. Mix well to combine.
Add the potatoes, peas, and lemon juice and stir to combine. You can add some more water if it is too dry. Cook until potatoes and peas are heated through.
5. Remove from heat and set aside.
6. Lay out wonton wrappers on countertop with small bowl of water.
7. Dip your finger in the water, and wet the outer sides of the wonton wrapper (all four sides).  This will help make the edges stick together.
8. Spoon the potato filling into the center of the wonton wrapper (about a tablespoon), then bring adjacent corners together (i.e. top right corner to the bottom left corner; then top left corner to the bottom right corner).  Squeeze all four corners tight so they stick together.
9. Repeat steps 6-8 until you've used up all of the filling. Then bake for 10-12 minutes, or until wonton wrappers are brown and crispy.

Tuesday, October 12, 2010

Curried Pumpkin Coconut Soup

Today was the perfect crisp fall day in Portland.  The leaves are just starting to turn, with bright red and golden yellow swirling through the wind as the leaves fall off the trees.  The perfect day for delicious warm and creamy pumpkin soup, with a crunchy grilled cheese sandwich for dipping.

Now I always advocate for fresh ingredients; avoid dried, frozen, or canned as much as possible.  Welp, I used canned pumpkin here folks. You'll get more flavor if you puree your own fresh pumpkin, but it was just not in the cards this week for me.

I took the leftovers for lunch at work.  I had a baked potato leftover from the weekend that I didn't know what to do with, so I chopped it up and put it in the soup on a whim. holy.moly. The potato added an amazing richness and perfect texture to the soup. It was as if the two were meant for each other, soul mates, if you will.
Curried Pumpkin Coconut Soup
Serves 4

Ingredients:
1 small onion, diced
3 tbsp canola oil
1/2 tsp grated fresh ginger
2 cloves garlic, minced
1 cup vegetable broth
1 14 ounce can coconut milk
1 15 ounce can pumpkin puree (not pie filling)
1/4 tsp cumin
1/4 tsp ground coriander 
1/2 tsp curry paste or powder
pinch of cinnamon
salt to taste
 
Directions:
1. In a large pot, sautee the onions in the oil until onions turn soft and translucent.
2. Add the garlic and ginger and saute for 2-3 minutes longer.
3. Add the pumpkin, coconut milk, and spices; stir to combine.
4. Add the broth slowly, until you reach the desired consistency (I like mine on the thick side)
3. Simmer over low heat for at least fifteen minutes, stirring occasionally.
4. Puree in food processor or blender until creamy and smooth.

Tuesday, October 5, 2010

Cinnamon Apple-Pear Sauce


Hello Fall, I fought your arrival as long as I could, but here you are with your apples and squash...and...I...can't...resist.

My good friend Anna over at Put Up With Me volunteers at The Portland Fruit Tree Project, a super cool non-profit that organizes groups of volunteers to pick fruit from local trees. Half of the fruit is donated to local food banks, and the other half is divided up amongst the volunteers.  I was the lucky recipient of several pounds of Asian Pears from Anna's latest harvest.  She used her pears to make an Asian Pear Sorbet.  You should check it out.


I'd never had an asian pear before.  They look like a pear, they taste like a pear, but they have the texture of an apple! It is very surreal and delicious.

 
I decided to make an Apple-Pear sauce, in the crock pot. It's super easy to make; chop up the fruit, add some cinnamon, some water, throw it in a crock pot, and cook on low for about 6 hours. Then puree in a food processor or blender and voila! 


You can use any firm pear you like if asian pears are difficult to find (they can get pretty spendy too).  


Cinnamon Apple-Pear Sauce
Serves 6-8

Ingredients:
4 large tart apples (I used Honey Crisp)
8 small firm pears (I used Asian Pears)
1/2 cup water
2 tbs lemon juice
1/2 tbs cinnamon
1/8 cup brown sugar (optional)

Directions:
1. Peel the apples and pears
2. Slice (making sure to remove any seeds and tough core pieces) and put in crock pot.
3. Add the rest of the ingredients, cover, and let cook on low for 6 hours.
4. Once fruit is soft and breaking apart, remove from heat and allow to cool.  Then puree in a food processor or blender until smooth.
5. Enjoy!

Thursday, September 30, 2010

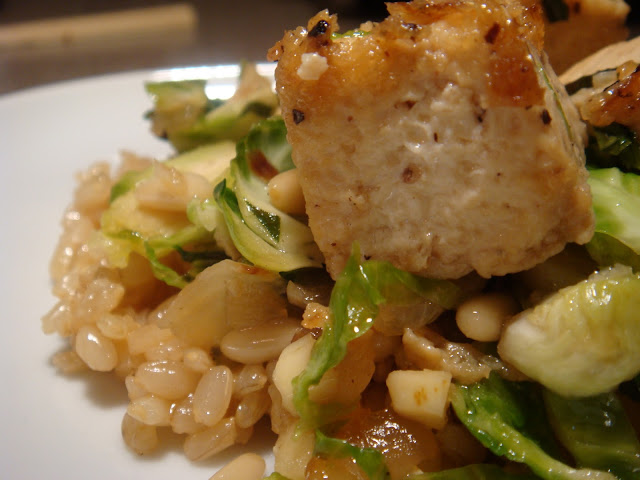
Caramelized Tofu and Brussels Sprouts


It sure has been a while.  In my absence I've managed to buy a house (!) and visit The Baby a time or two.  It's amazing how fast time goes, and how darn cute The Baby is (and how his adorableness seems to grow each time I see him).


This recipe is very simple, very healthy, and very easy to make!  It takes about 20 minutes total (not including the time to make brown rice - which I usually make in big batches on Sunday nights for the week).  You could also serve this over a delicious and nutty quinoa, instead of brown rice.  It takes significantly less time to make, and would compliment the bitterness of the brussels sprouts and the sweetness of the brown sugar nicely.

Recipe adapted from 101 Cookbooks


Caramelized Tofu and Brussels Sprouts
Serves 4

Ingredients
7 - 8 ounces extra-firm tofu, drained and cut into thin 1-inch segments
1 small onion, diced
2 medium cloves garlic, minced
1/2 lb. brussels sprouts, washed and cut into 1/8-inch wide ribbons
1/4 cup cup pine nuts, toasted
3 tablespoons brown sugar
1/4 cup basil, chopped
Salt and Pepper to taste
A few splashes of canola oil
A drizzle of 100% pure maple syrup (optional)


Directions:
1. Heat oil in a skillet over medium heat and add the tofu. Cook until browned.
2. Heat oil in a second skillet on medium-low heat and add the onions. Cook slowly until they begin to caramelize.  Add garlic and Brussels sprouts and cook about 5 minutes.
3. Add half of the brown sugar to the tofu and stir to coat. Cook about 1-2 minutes.
4. Add the Brussels Sprouts mixture and pine nuts to the tofu. Then add the remaining brown sugar and stir to coat.  Cook until Brussels Sprouts begin to brown.
5. Finish with chopped fresh basil, maple syrup, and salt & pepper to taste.
6. Serve over brown rice, and enjoy!

Wednesday, September 15, 2010

Roasted Corn and Squash Risotto


It's 11:45pm on a Tuesday night and I am writing from the hospital, where The Boyfriend's sister is in labor! We've been anxiously awaiting this moment for so long, and here I am sitting in the small, cramped waiting room so excited I don't know what to do with myself. Rather than pace around the hospital, I might as well do something useful...

Today's recipe is a roasted corn and squash risotto.  I have a small obsession with risotto. It sounds fancy, it tastes fancy, it looks fancy, and it is sure to impress anyone you serve it to - but it is one of the easiest recipes to make. Do not mistake easy with quick though; be forewarned, you will need at least an hour.

The basic method for making any risotto is simple - toast the rice, then slowly add broth, about a cup at a time, until the rice is plump, thick, and creamy.  You can switch up the ingredients once you get the basic method down.

While you make the risotto, roast the squash and corn in the oven. Then add to the risotto at the very end.


Roasted Corn and Squash Risotto
Serves 6-8
 

Ingredients
1 small squash (butternut, acorn, or whatever you like)
1 cup corn kernels (fresh or frozen)
1 tbs oil
1 small onion, minced
1 clove of garlic, minced
1 cup arborio rice
1/4 cup white wine (optional)
5 cups vegetable broth
salt & pepper to taste
fresh basil to taste

Directions
1. Preheat oven to 400 degrees.  Meanwhile, cut the squash in half and add salt & pepper.  Bake squash for about a half hour.
2. After the squash has roasted for a half hour, add the corn and let roast for an additional 15 minutes.  Peel the skins off the squash and chop in to large chunks, set aside.
3. While the squash is baking, add oil to a saute pan and add the onions. Saute until translucent.
4. Warm the vegetable broth in a soup pan (keep this on low)
5. Add the rice (dry) and garlic to the saute pan; allow to toast for 3-5 minutes (you'll notice the specs of rice begin to become translucent as well). Add the white wine and allow rice to absorb completely.
6. Add one cup of the vegetable broth, and stir, stir, stir until absorbed. Once absorbed, add another cup of broth and continue to stir, stir, stir. Repeat until all of the broth is used up and the rice has become thick and creamy. Be sure to stir constantly, it will burn and stick to the bottom of the pan before you know it! (and if this happens - don't worry, just add some more broth and stir)
7. Once all of the broth is used up and the risotto is soft, thick, and creamy, add the roasted corn and squash. Add salt, pepper, and chopped basil to finish.
8. Enjoy!

Saturday, September 4, 2010

Corn Chowder

So here it is, my first post. I have wrestled with the idea of creating a food blog for the better part of the last year. I finally created this page several weeks ago, and I have stared at the blank white screen every single day with absolutely no idea where to begin. Today seems like just as good a day as any, so let’s start with this: Corn Chowder.


The secret ingredient in this recipe is corn broth. Yes, you heard me: corn broth. It is so incredibly easy to make, and adds such an incredible richness to the recipe that you will wonder “where has this been my whole life?!”.
 

This is a great make-ahead recipe; it is even better the next day, once the flavors have melded together.


Corn Chowder
Serves: 6-8

Recipe adapted from The Gluten Free Vegan
 
Ingredients:
6-8 ears of fresh corn on the cob
2 ½ cups water
1 tbs Olive oil
1 leek (or small onion), diced
2 red potatoes, chopped
1 yam (or sweet potato), chopped
1 can coconut milk (
or any kind of milk you like)
salt & pepper to taste
2 tbs vegetable base 

Directions:
1. Add the water to a saucepan and put on medium heat, add a pinch of salt.
2. Cut the corn kernels off the cobs and set aside. Place the corncobs in the salted water and cover. Let this simmer on low while you make the soup (
you can also make this ahead and throw it in a crock pot – the longer this can cook, the more flavor the broth will have).
3. While the broth is simmering, add olive oil to a soup pot and turn on medium to low heat. While that heats up, chop your leek (or onion) & add to the pan. Let this sauté until translucent.
4. Chop the potatoes & yam and add to the pot with the leek. Allow this to cook for 5 – 10 minutes.
5. While the potatoes and leek sauté, prepare the broth: remove from heat and strain through a sieve (
a colander would work as well, it just won’t keep out as much of the corn). Discard the corncobs. Add the vegetable base to the corn broth and stir well.
6. Add the broth to the potato-leek pot. Add the corn you set aside previously. Cover and let simmer on medium heat until the potatoes start to soften (
you don’t want them to overcook, or else they will get mushy!)
7. Once the potatoes begin to soften, add the can of coconut milk. Add salt & pepper to taste.
8. Enjoy!
Related Posts Plugin for WordPress, Blogger...