Thursday, September 30, 2010

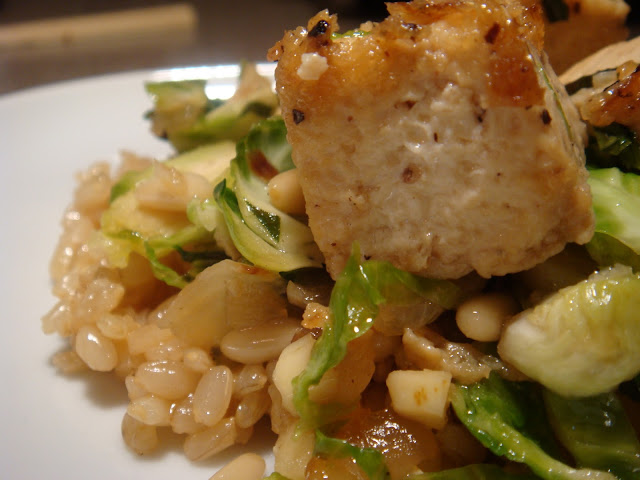
Caramelized Tofu and Brussels Sprouts


It sure has been a while.  In my absence I've managed to buy a house (!) and visit The Baby a time or two.  It's amazing how fast time goes, and how darn cute The Baby is (and how his adorableness seems to grow each time I see him).


This recipe is very simple, very healthy, and very easy to make!  It takes about 20 minutes total (not including the time to make brown rice - which I usually make in big batches on Sunday nights for the week).  You could also serve this over a delicious and nutty quinoa, instead of brown rice.  It takes significantly less time to make, and would compliment the bitterness of the brussels sprouts and the sweetness of the brown sugar nicely.

Recipe adapted from 101 Cookbooks


Caramelized Tofu and Brussels Sprouts
Serves 4

Ingredients
7 - 8 ounces extra-firm tofu, drained and cut into thin 1-inch segments
1 small onion, diced
2 medium cloves garlic, minced
1/2 lb. brussels sprouts, washed and cut into 1/8-inch wide ribbons
1/4 cup cup pine nuts, toasted
3 tablespoons brown sugar
1/4 cup basil, chopped
Salt and Pepper to taste
A few splashes of canola oil
A drizzle of 100% pure maple syrup (optional)


Directions:
1. Heat oil in a skillet over medium heat and add the tofu. Cook until browned.
2. Heat oil in a second skillet on medium-low heat and add the onions. Cook slowly until they begin to caramelize.  Add garlic and Brussels sprouts and cook about 5 minutes.
3. Add half of the brown sugar to the tofu and stir to coat. Cook about 1-2 minutes.
4. Add the Brussels Sprouts mixture and pine nuts to the tofu. Then add the remaining brown sugar and stir to coat.  Cook until Brussels Sprouts begin to brown.
5. Finish with chopped fresh basil, maple syrup, and salt & pepper to taste.
6. Serve over brown rice, and enjoy!

Sunday, September 19, 2010

Balsamic Roasted Tomato Caprese Sandwich


I am doing my best to establish a routine for posting, aiming for a Saturday / Wednesday schedule.  Well, schedule to the wind because this sandwich is so incredibly delicious, I cannot possibly wait until Wednesday to share it.  Seriously, drop whatever you are doing and make this now!

I saw Closet Cooking's recipe for Balsamic Roasted Tomato Caprese Sandwich last week, and have found myself staring at his beautiful photo, salivating (at work might I add - how am I supposed to be productive with posts like this!?).

While down in Eugene, OR for the The Labor, The Boyfriend's mom gave us a bunch of tomatoes, fresh from her garden.  I knew exactly how I would use them.  Might I also add that The Boyfriend despises tomatoes and ate this up, ready for seconds, immediately!


You can make this ahead by roasting the tomatoes and storing in the fridge in an air-tight container. It takes mere seconds to assemble the sandwich.  (I'll give you one guess as to what I will be devouring for lunches this week...)


Balsamic Roasted Tomato Caprese Sandwich
Serves 4

Ingredients:
4 ripe tomatoes (cut in half)
2 cloves garlic, chopped
salt and pepper to taste
drizzle of olive oil
drizzle of balsamic vinegar
fresh mozzarella, sliced
1 handful basil leaves
crusty bread, sliced into 1/2 inch slices (I used fresh sourdough from a local bakery)

Directions:
1. Pre-heat oven to 350 degrees.
2. Place the tomatoes on a baking sheet, cut side facing up.
3. Sprinkle with the garlic, salt & pepper, and drizzle with the oil and vinegar.
4. Roast the tomatoes in oven for one hour.
5. Toast the bread slices until nice and crunchy.
6. Let the tomatoes cool, and assemble the sandwich.
7. Enjoy!

Saturday, September 18, 2010

Pesto Potato Frittata


What do you make when it's 6:30pm and you're just getting home from work tired, hungry, grouchy, and have not thought for a single second about dinner (did I mention you also spent the night before at the hospital anxiously awaiting the birth of your boyfriend's ADORABLE nephew, and now you suspect you are coming down with The Sickness)?  You make a frittata.

I had gotten this recipe for a Pesto Potato Frittata in my inbox a few weeks ago and it's been floating around in my head, waiting for the perfect moment to surface ever since. Earlier this week (under the above circumstances) was certainly my big moment. Frittatas are easy and quick to make, and perfect for my particular situation.

This recipe was adapted from Vegetarian Times. Their recipe calls for 2 tbs of mustard - which I was very excited about. I love mustard, like REALLY love it. It had never occurred to me to put it IN a frittata (it almost always winds up on ON it). I couldn't wait to try it out! Aaaand I completely forgot to put it in... I am leaving it out of this recipe for that reason, but it is making it in to my next one for sure and I encourage you to try it out in your's (and tell me how it turns out so I can live vicariously through you). 

Frittatas are great make ahead meals.  They are good straight out of the oven, and equally as delicious the next day at room temperature or even cold. 


Pesto Potato Frittata
Serves 8

Ingredients
1 Tbs. olive oil, divided
1 1/2 lb. red potatoes, cubed (3 cups)
1 small onion, diced
1 small red bell pepper, diced
2 cups fresh basil leaves
2 cloves garlic, peeled
6 large eggs
3 large egg whites
1/4 cup grated Parmesan cheese
1/4 cup grated Fontina cheese

Directions
1. Pre-heat oven to 350 degrees
2. Heat oil in skillet over medium heat. Add onion and saute until translucent. Add the potatoes and cook about 15 minutes, or until potatoes and onion begin to brown, stirring often.
3. Meanwhile, place basil and garlic in food processor, and pulse until finely chopped and combined. Add eggs, egg whites and blend 1 minute, or until frothy. Stir egg mixture into potato mixture.
4. Add the cheese and stir throughout. Arrange the red pepper on top.
5. Cook about 10 minutes, until the bottom starts to set.
6. Place skillet in oven (make sure it's one that can go in the oven!) until the egg is cooked through, about 8-10 minutes (keep a close eye on on it, it'll dry out if overcooked).

Wednesday, September 15, 2010

Roasted Corn and Squash Risotto


It's 11:45pm on a Tuesday night and I am writing from the hospital, where The Boyfriend's sister is in labor! We've been anxiously awaiting this moment for so long, and here I am sitting in the small, cramped waiting room so excited I don't know what to do with myself. Rather than pace around the hospital, I might as well do something useful...

Today's recipe is a roasted corn and squash risotto.  I have a small obsession with risotto. It sounds fancy, it tastes fancy, it looks fancy, and it is sure to impress anyone you serve it to - but it is one of the easiest recipes to make. Do not mistake easy with quick though; be forewarned, you will need at least an hour.

The basic method for making any risotto is simple - toast the rice, then slowly add broth, about a cup at a time, until the rice is plump, thick, and creamy.  You can switch up the ingredients once you get the basic method down.

While you make the risotto, roast the squash and corn in the oven. Then add to the risotto at the very end.


Roasted Corn and Squash Risotto
Serves 6-8
 

Ingredients
1 small squash (butternut, acorn, or whatever you like)
1 cup corn kernels (fresh or frozen)
1 tbs oil
1 small onion, minced
1 clove of garlic, minced
1 cup arborio rice
1/4 cup white wine (optional)
5 cups vegetable broth
salt & pepper to taste
fresh basil to taste

Directions
1. Preheat oven to 400 degrees.  Meanwhile, cut the squash in half and add salt & pepper.  Bake squash for about a half hour.
2. After the squash has roasted for a half hour, add the corn and let roast for an additional 15 minutes.  Peel the skins off the squash and chop in to large chunks, set aside.
3. While the squash is baking, add oil to a saute pan and add the onions. Saute until translucent.
4. Warm the vegetable broth in a soup pan (keep this on low)
5. Add the rice (dry) and garlic to the saute pan; allow to toast for 3-5 minutes (you'll notice the specs of rice begin to become translucent as well). Add the white wine and allow rice to absorb completely.
6. Add one cup of the vegetable broth, and stir, stir, stir until absorbed. Once absorbed, add another cup of broth and continue to stir, stir, stir. Repeat until all of the broth is used up and the rice has become thick and creamy. Be sure to stir constantly, it will burn and stick to the bottom of the pan before you know it! (and if this happens - don't worry, just add some more broth and stir)
7. Once all of the broth is used up and the risotto is soft, thick, and creamy, add the roasted corn and squash. Add salt, pepper, and chopped basil to finish.
8. Enjoy!

Sunday, September 12, 2010

Smoked Gouda Mac and Cheese


Mac and Cheese is the ultimate comfort food.  Comfort from what you ask? From Portland's rainy season trying to sneak in a little early.  I'm not sure where the summer went, and I have not come to terms with the fact that it is coming to a close.  It's been chilly over the last week and feels like it's time for a good butternut squash recipe, but to eat squash is to surrender to the coming winter. So in my denial, I bring to you Mac and Cheese.

I've made a lot of Mac and Cheese in my life (I mean, who hasn't really) but this is my new favorite recipe.  I should add a little disclaimer - I am not a sharp mac and cheese kind of girl.  I like my mac and cheese to be smooth, mild, and creamy. My cheeses of choice are smoked Gouda and Fontina.  The Fontina cuts the intense flavor of the smoked Gouda adding a deliciously mild and creamy texture.  If you prefer your mac and cheese to be on the sharp side, substitute sharp Cheddar for the Fontina (or go all out, and add all three!...).

Recipe is adapted from: rhondamary at All Recipes 

This is by all means not a dairy-free recipe (hello, cheese anyone?!), but I still make substitutions where I can. There is absolutely no substitute for cheese, but milk and butter are very easy - no one would ever know the difference, I promise!  If you prefer the real thing, you can use regular cows milk and regular ol' butter.

Smoked Gouda Mac and Cheese
Makes 6-8 servings

You can also easily make this ahead of time. Just follow steps 1 through 4, then cover and place in the fridge.  When ready to make, complete steps 5 and 6.

Ingredients
2 cups whole wheat elbow macaroni (or any short pasta would work)
2 1/2 tablespoons butter (I use Smart Balance Light, which is 100% non-dairy)
2 tablespoons all-purpose flour
2 1/2 cups Soy milk (you can use cows milk if you prefer; or rice, almond, hemp, or even coconut milk as well)
1/2 teaspoon salt
1/4 teaspoon ground pepper
4 ounces smoked Gouda cheese, shredded
2 or 3 ounces fontina cheese, shredded
1/2 cup Panko bread crumbs

Directions
 
1.    Preheat oven to 375 degrees. Lightly grease a 10 inch casserole dish.
2.    Bring a large pot of lightly salted water to a boil. Add pasta and cook for 8 to 10 minutes or until al dente; drain.  
3.    Melt butter in a small saucepan over medium heat. Stir in the flour and cook until a roux forms. Stir in the milk, salt and pepper; cook, stirring constantly, until sauce is smooth and thick and coats the back of a spoon. Remove from heat and stir in cheese (leave some on the side to sprinkle on top later).
4.    Combine cooked pasta and cheese sauce; transfer to prepared dish.
5.    Sprinkle the bread crumbs over the top, then add the leftover cheese.
6.    Bake in preheated oven for 15 minutes, or until heated through.

Saturday, September 4, 2010

Corn Chowder

So here it is, my first post. I have wrestled with the idea of creating a food blog for the better part of the last year. I finally created this page several weeks ago, and I have stared at the blank white screen every single day with absolutely no idea where to begin. Today seems like just as good a day as any, so let’s start with this: Corn Chowder.


The secret ingredient in this recipe is corn broth. Yes, you heard me: corn broth. It is so incredibly easy to make, and adds such an incredible richness to the recipe that you will wonder “where has this been my whole life?!”.
 

This is a great make-ahead recipe; it is even better the next day, once the flavors have melded together.


Corn Chowder
Serves: 6-8

Recipe adapted from The Gluten Free Vegan
 
Ingredients:
6-8 ears of fresh corn on the cob
2 ½ cups water
1 tbs Olive oil
1 leek (or small onion), diced
2 red potatoes, chopped
1 yam (or sweet potato), chopped
1 can coconut milk (
or any kind of milk you like)
salt & pepper to taste
2 tbs vegetable base 

Directions:
1. Add the water to a saucepan and put on medium heat, add a pinch of salt.
2. Cut the corn kernels off the cobs and set aside. Place the corncobs in the salted water and cover. Let this simmer on low while you make the soup (
you can also make this ahead and throw it in a crock pot – the longer this can cook, the more flavor the broth will have).
3. While the broth is simmering, add olive oil to a soup pot and turn on medium to low heat. While that heats up, chop your leek (or onion) & add to the pan. Let this sauté until translucent.
4. Chop the potatoes & yam and add to the pot with the leek. Allow this to cook for 5 – 10 minutes.
5. While the potatoes and leek sauté, prepare the broth: remove from heat and strain through a sieve (
a colander would work as well, it just won’t keep out as much of the corn). Discard the corncobs. Add the vegetable base to the corn broth and stir well.
6. Add the broth to the potato-leek pot. Add the corn you set aside previously. Cover and let simmer on medium heat until the potatoes start to soften (
you don’t want them to overcook, or else they will get mushy!)
7. Once the potatoes begin to soften, add the can of coconut milk. Add salt & pepper to taste.
8. Enjoy!
Related Posts Plugin for WordPress, Blogger...